
This article describes how to use Postman to perform administration operations using AerAdmin. Once you're comfortable working with these APIs, refer to the full library of functions in the AerAdmin 5.0 Rest API Reference.
In this article:
Basics
The AerAdmin API enables you to programmatically manage your account, devices, and alerts. AerAdmin provides different endpoints (URLs where the API receives requests for resources or functionality) that correspond with various actions. For example, one endpoint can help you retrieve details about a specific device, while another can help you provision your devices.
Note: You can also perform these tasks in the AerPort portal.
To use the AerAdmin API, you must have your Account API Key:
- Navigate to the AerPort portal
- In the left-side menu, click Account. This opens a pop-up menu that displays
your Account ID in parentheses.

- Click Manage API Keys to open the API Key Management screen, which enables you to view, create, edit, and delete your account's API keys.
- Your Account API keys appear in the API Key Management table.
Note: Your API key must include AerAdmin as a supported function. To view an API key's supported functions, click the + icon to the left of the API key.

For more information, see Manage API Keys.
Single Operation - Provision Device
The following subsections describe how to provision a single device’s SIM
using the /rest/devices/provision
endpoint:
- Identify the ICCID
- Provision the Device
- Verify the Provision
- Configure the SIM for Data Transmission
Identify the ICCID
Before you can provision a device, you need the SIM’s ICCID. To identify an unprovisioned SIM and copy its ICCID in the AerPort portal:
- Navigate to the AerPort portal and select SIMs > Activate SIMs.
The screen provides an inventory of unprovisioned SIMs:
Note: You may want to provision based on the date of the SIM (e.g. a SIM received within the last month). The Date Assigned column can be useful for identifying the SIM.

- If available, select your organization’s Product.
Note: Many customers have only one product, so you may not see this drop-down.

- Click the checkbox to the left of the SIM’s ICCID and copy the ICCID
field value on the right.

- Save the SIM’s ICCID so you can use it to populate the
ICCIDfield of the REST request’s body.
Provision the Device
To provision the device via the AerAdmin API:
- Open a new tab in Postman and set the request type to
POST:

- Enter the following URL and replace
{apiKey}with your account API key:https://aeradminapi.aeris.com/AerAdmin_WS_5_0/rest/devices/provision?apiKey={apiKey} - Select the Headers tab and enter the key/value header pairs in
the following image:

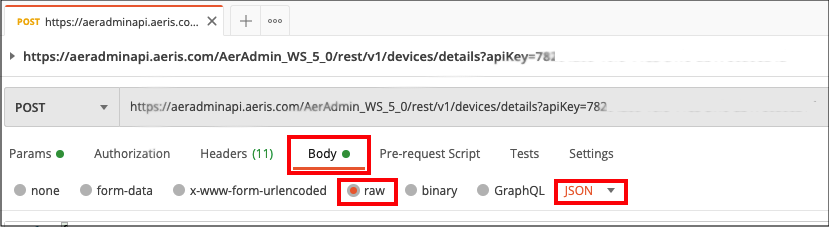
- Select the Body tab, set the type to raw, and ensure
JSON is selected.
- Enter the following JSON body and replace each item in
{}with the appropriate information for your account:Notes:- Since the endpoint enables you to provision various settings for a device, you must enter the appropriate device fields to configure.
- Use the ICCID value from Identify the
ICCID to populate the
accessProfiles>ICCIDfield. - Use one of the following product IDs depending on the SIM type:
-
1: City SIM -
2: Global SIM -
7: SelfServe SIM -
12: Dual-Mode CG -
25: Dual-Mode LC -
27: Tri-Mode -
28: Dual-Mode A-LH -
41: Fusion Global -
42: Fusion NA -
43: Global eSIM -
47: Fusion Global HD
-
{
	"accountID": 11173,
	"email": "aerport@aeris.net",
	"productId": 2,
	"applicationType": "M",
	"startBilling": true,
	"customAttributes": [{
    	  "attributeName": "customField1",
    	  "attributeValue": "C1"
	},
	"accessProfiles": [{
   	  "technology": "GSM",
   	  "ICCID": "89918000817970000047",
   	  "ratePlan": "rpGSM",
   	  "serviceProfile": "testafGSM"
	}],
	"provisionProfile": {
   	  "reportGroup": 0
	}
}
For more information, see the Provision Device section in the API Reference Guide.
- Click Send to invoke the request. A successful response
Status is 200 OK and the response body should look similar to the following:
{ "transactionID": "4dadb620-fd15-11e7-83cd-020f44a6d939", "resultCode": 0, "resultMessage": "OK", "opCompletionTimestamp": "2018-01-19T12:36:01.000Z", "deviceProfileId": "AER0000008338945", "deviceProfiles": [ { "result": { "resultCode": 0, "resultMessage": "OK" }, "ICCID": "89918000817970000047", "IMSI": "405800970000007", "MSISDN": "11836420334", "IMEI":"310170207733033", "technology": "GSM", "profileAttributes": [ { "attributeName": "ALT_MSISDN" } ] } ] } - Verify that
resultMessageisOK. This indicates that the device was successfully provisioned. The results include other useful identifiers for the SIM, including theMSISDNwhich is assigned during the provision process.
Verify the Provision
To verify whether a device has been successfully provisioned using the portal:
- Navigate to the portal and select SIMs > Manage SIMs:

- Look for the SIM with the matching ICCID. The list is sorted by the latest modifications, so the device should be near the top of the list.
- (Optional) Select the SIM’s row to display additional details.
Configure the SIM for Data Transmission
After provisioning, you need to configure the SIM for data transmission. To learn more, see Configuring the Access Point Name (APN).
Single Operation - Get Device Details (Structured Response)
To use the devices/details endpoint to get detailed information about a specific device:
- Open a new tab in Postman and set the request type to POST.
- Enter the following URL and replace
{apiKey}with your account API key:https://aeradminapi.aeris.com/AerAdmin_WS_5_0/rest/v1/devices/details?apiKey={apiKey} - Select the Headers tab and enter the following key/value header
pairs:
Key Value Acceptapplication/jsonContent-Typeapplication/jsonAccept-Charsetutf-8 - Select the Body tab, set the type to raw, and ensure JSON is selected.
- Enter the following JSON body and replace each item in
{}with the appropriate information for your account.Note: Since the endpoint enables you to search for a device based on different IDs (e.g., MEID, IMSI, etc.), you must enter the appropriate device fields based on the type of search. For example, the following body includes
IMSIto search for a device based on its IMSI value:{ "accountID": "{accountID}", "email": "{email}", "IMSI": "{deviceIMSIValue}" }
For more information, see the Get Device Details section in the API Reference Guide.
- Click Send to invoke the request. A successful response Status
is 200 OK and the response body should look similar to the following:

Account Operation – Get Activity
To use the /accounts/<accountId>/device/<deviceIdType>/<deviceId>/
activity endpoint to retrieve device activity:
- Identify the device’s IMSI or ICCID.
- Open a new tab in Postman and set the request type to GET.
- Enter the following URL and replace the following information with your
account or device details:
-
{accountId}: Your account ID. -
{deviceIdType}: EitherIMSIorICCID,depending on the identifier you want to use. -
{deviceId}: Your device’s IMSI or ICCID value, depending on the{deviceIdType}you want to use. -
{apiKey}: Your API key.
https://aeradminapi.aeris.com/AerAdmin_WS_5_0/rest/accounts/{accountId}/device/{deviceIdType}/{deviceId}/activity?apiKey={apiKey} -
- Select the Headers tab and enter the following key/value header
pairs:
Key Value Acceptapplication/jsonContent-Typeapplication/jsonAccept-Charsetutf-8 - Click Send to invoke the request. A successful response Status
is 200 OK and the response body should contain a collection of objects describing
activities, similar to the following:
[
	{
    	"deviceId": 39193529,
    	"accountId": 11173,
    	"changeDate": "2023-11-18",
    	"changeType": "Status",
    	"changeValue": "Bill",
    	"changedBy": "aerport@aeris.net",
    	"mdn": "11835420739",
    	"meid": null,
    	"hexMeid": null,
    	"iccid": "89185000150911597645",
    	"imei": "353439061100592",
    	"imsi": "204043396464386",
    	"msisdn": "11835420739",
    	"min": null,
    	"esn": null,
    	"hexEsn": null,
    	"eid": null,
    	"technology": "LTE",
    	"deviceProfileId": "AER0000006169012",
    	"primaryTechnologyOfNewDevice": null
	},
	{
    	"deviceId": 39193529,
    	"accountId": 11173,
    	"changeDate": "2023-11-18",
    	"changeType": "Status",
    	"changeValue": "Suspend",
    	"changedBy": "aerport@aeris.net",
    	"mdn": "11835420739",
    	"meid": null,
    	"hexMeid": null,
    	"iccid": "89185000150911597645",
    	"imei": "204043396464386",
    	"msisdn": "11835420739",
    	"min": null,
    	"esn": null,
    	"hexEsn": null,
    	"eid": null,
    	"technology": "LTE",
    	"deviceProfileId": "AER0000006169012",
    	"primaryTechnologyOfNewDevice": null
	},
...
]
Connectivity – Bulk Device Provision
You can provision, reprovision, and/or activate multiple devices in a single
request using the Connectivity /<AccountID>/bulk-provision endpoint. The
Connectivity APIs enable you to work with your devices in bulk. The APIs produce a
Transaction History CSV file with details about success or failure of each device.
- The Connectivity API enables you to provision devices from multiple products in a single operation.
- The host name in the URI for Connectivity APIs is different from other APIs.
- To provision a single device, see Single Operation - Provision Device.
The following subsections describe how to:
Identify the ICCIDs
Before you can bulk provision devices, you need the ICCIDs of their SIMs. To identify unprovisioned SIMs and copy their ICCIDs using the AerPort portal:
- Navigate to the AerPort portal and select SIMs > Activate SIMs.
The screen provides an inventory of unprovisioned SIMs.
Note: You may want to provision based on when the SIMs were assigned to your account. You can use the Date Assigned column to identify when SIMs were added.
- If available, select your organization’s Product.
Note: Many customers only have one product, so you may not see this drop-down.
- Click Export to download a
CSVfile of details for each unprovisioned SIM. The exported file contains a simple list of ICCIDs, IMSIs, and Date Assigned for your devices. - If you are provisioning SIMs from multiple products, repeat steps 2 and 3.
- Use the
CSVfile(s) to identify which SIMs to provision. - If you are provisioning SIMs from multiple products, repeat step 5 for each exported file.
Bulk Provision the Devices
Use the steps below to bulk provision the devices via the AerAdmin API:
- Open a new tab in Postman and set the request type to
POST:
- Enter the following URL and replace
{accountId}and{apiKey}with your account ID API key respectively:https://connectivity.aerisapis.com/AerAdmin_WS_5_0/rest/{accountID}/bulk-provision?apiKey={apiKey} - Select the Headers tab and enter the following key/value header
pairs:
Key Value Acceptapplication/jsonContent-Typeapplication/jsonAccept-Charsetutf-8 - Select the Body tab, set the type to raw, and ensure JSON is selected.
- Enter the following JSON body and replace each item in
{}with the appropriate information for your account. In the example below, there are two objects inaccessProfilesfor two devices to be bulk provisioned:Notes:
- Since the endpoint enables you to provision various settings for a device, you must enter the appropriate device fields to configure.
- Use the ICCID values from Identify
the ICCIDs to populate the
accessProfiles>ICCIDfields. - Use one of the following product IDs depending on the SIM type:
-
1: City SIM -
2: Global SIM -
7: SelfServe SIM -
12: Dual-Mode CG -
25: Dual-Mode LC -
27: Tri-Mode -
28: Dual-Mode A-LH -
41: Fusion Global -
42: Fusion NA -
43: Global eSIM -
47: Fusion Global HD
-
{ "email": "AerisTechPubs@gmail.com", "productId": 41, "applicationType": "M", "startBilling": false, "accessProfiles": [ { "technology": "LTE", "ICCID": "89185002191118367257" }, { "technology": "LTE", "ICCID": "56234872347273728737" } ], "provisionProfile": { "ratePlan": "FUSION_GL_2MB", "serviceProfile": "FG_IOT_01", "assignStaticIp": false } } - Click Send to invoke the request. A successful response
Status is 200 OK and the response body should look similar to the following:
{ "response": { "transactionId": "3e6a7290-5128-11eb-964c-fe193c05150d", "operationType": "UPLOAD_CSV", "resultCode": 0, "errorMessage": "" } } - (Optional) To get more information about the returned transaction, see Connectivity - Get Bulk Transaction Status Information.
Connectivity – Get Bulk Transaction Status Information
To use the /rest/<accountID/bulkoperations/<transactionId>
endpoint to get general information about a transaction, including the status of a bulk
operation:
- Identify the ID of the transaction that you want to get information about.
- Open a new tab in Postman and set the request type to GET.
- Enter the following URL and replace
{accountId}and{apiKey}with your account ID API key respectively. Replace{transactionId}with the ID of the transaction.https://aeradminapi.aeris.com/AerAdmin_WS_5_0/rest/{accountID}/bulkoperations/{transactionId}?apiKey={apiKey} - Select the Headers tab and enter the following key/value header
pairs:
Key Value Acceptapplication/jsonContent-Typeapplication/jsonAccept-Charsetutf-8 - Click Send to invoke the request. A successful response Status
is 200 OK and the response body should contain transaction information, similar to
the following:
{
	"email": "AerisTechPubs@gmail.com",
	"transactionID": "66db8e17-4cdf-44a5-9554-15462f7e322",
	"operation": "BulkProvision",
	"operationStatus": "Complete",
	"operationCount": 2,
	"successCount": 2,
	"failCount": 0,
	"inProgressCount": 0,
	"createDate": "11/20/2023 14:45:38",
	"modifiedDate": "11/20/2023 15:53:16",
	"accountID": 27585,
	"userID": 0,
	"processedOperationCount": 2,
	"emailSent": "Success"
}
Connectivity Alerts Operation - Get Connectivity Alerts
To use the /rest/accounts/<accountId>/alerts/profiles endpoint to get the
connectivity alert settings for a specific account:
- Open a new tab in Postman and set the request type to GET.
- Enter the following URL and replace
{accountId}and{apiKey}with your account ID API key respectively:https://aeradminapi.aeris.com/AerAdmin_WS_5_0/rest/accounts/{accountId}/alerts/profiles?apiKey={apiKey} - Select the Headers tab and enter the following key/value header
pairs:
Key Value Acceptapplication/jsonContent-Typeapplication/jsonAccept-Charsetutf-8 - Click Send to invoke the request. A successful response Status
is 200 OK and the response body should contain a collection of objects describing
alerts, similar to the following:
[
	{
    	"alertThresholdId": 128050,
    	"accountId": 11173,
    	"name": "Monthly 1 MB Alert",
    	"description": "Alert if data traffic goes over 1 MB during the month",
    	"alertType": "Packet",
    	"groupType": "Account",
    	"groupId": "27",
    	"deviceType": "",
    	"aggregateToGroup": true,
    	"timeInterval": "BillingCycle",
    	"timeIntervalUnit": null,
    	"timeIntervalValue": null,
    	"minValue": 0,
    	"maxValue": 1,
    	"unitOfMeasurement": "MB",
    	"textValue": null,
    	"effDate": "12-17-2022 00:00:00",
    	"expDate": null,
    	"createdBy": "aerport@aeris.net",
    	"createdDate": "12-17-2022 00:35:52",
    	"lastUpdatedBy": "aerport@aeris.net",
    	"lastUpdatedDate": "12-17-2022 00:35:52",
    	"alertCategory": null,
    	"alertSubType": "Packet",
    	"minThresholdUnit": "MB",
    	"masterAlert": false,
    	"thresholdType": "Usage",
    	"previsionVersionId": 0,
    	"actions": [
        	{
            	"actionId": 1,
            	"type": "Email",
            	"description": "send an email when a threshold is crossed",
            	"actionValue": null,
            	"effDate": null,
            	"expDate": null,
            	"createdBy": "aerport@aeris.net",
            	"createdDate": "2022-12-17",
            	"lastUpdatedBy": "coachleslie2012+10@gmail.com",
            	"lastUpdatedDate": "2022-12-17"
        	}
    	],
    	"deviceProfileLevel": false,
    	"prepaid": false
	},
...
]
0 Comments