
Activating a SIM is an activity which makes a device available for use on the Aeris network. Activation is necessary for the SIM to communicate over the network. This activity is also known as provisioning.
In this article:
Basics
The first step to enable your SIM for service is to activate it within the Aeris system.
The Activate SIMs screen is available from the SIMs menu. Selecting Activate SIMs displays a list of SIMs that are available to be activated. This screen acts like a SIM inventory for your account. It shows both new SIMs and previously canceled SIMs.
Use the Activate SIMs screen to provision new SIMs or reprovision existing canceled SIMs. Refer to the Configure Options Table under step 8 below for more information about reprovisioning.

Relationship to Carrier Networks
If your device belongs to a supported carrier network, and you will be managing it from AerPort, then you must activate it from AerPort or the API. Aeris will then activate the SIM on the supported carrier network.
AerPort allows you to provision all type of devices, such as eSIM, Global SIM, LTE, Dual-mode, or any other device. You must have the device identifier handy before activation. Typically, the device identifier is the unique identifier referred to as the Integrated Circuit Card ID (ICCID), printed on the SIM punch-out card. Below is a list of device types and the corresponding device identifier required for activation:
- City SIM: ICCID of the device
- Dual-Mode A-LH: ICCID of the device
- Fusion Global: ICCID of the device
- Fusion Global HD: ICCID of the device
- Fusion NA: ICCID of the device
- Global eSIM: EID of the device
- Global SIM: ICCID of the device
- Self-Serve SIM: ICCID of the device
You can contact your operator to fulfill these prerequisites.
Activating One or More SIMs
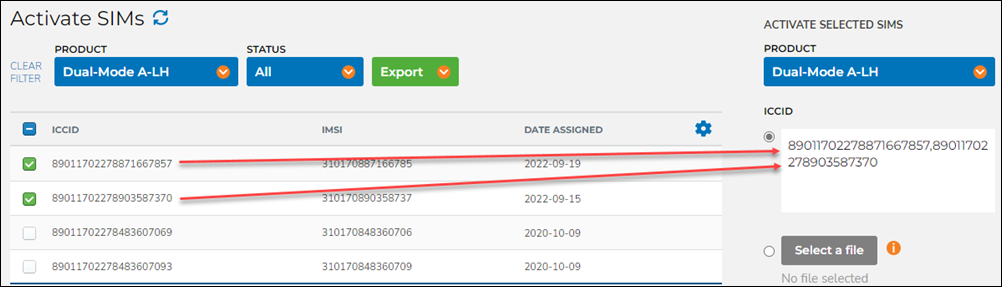
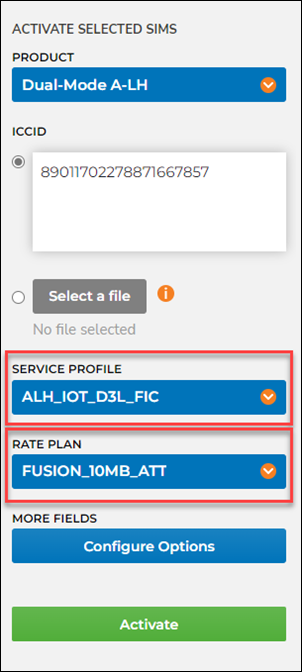
With this screen, you can activate one or more SIMs interactively by using the check boxes and filling out the form on the right side of the screen.
Note: To activate a large number of SIMs, consider using the option to upload a file containing the SIM information. See Bulk SIM Activation.
To activate SIMs:
- Select Activate SIMs from the SIMs menu.
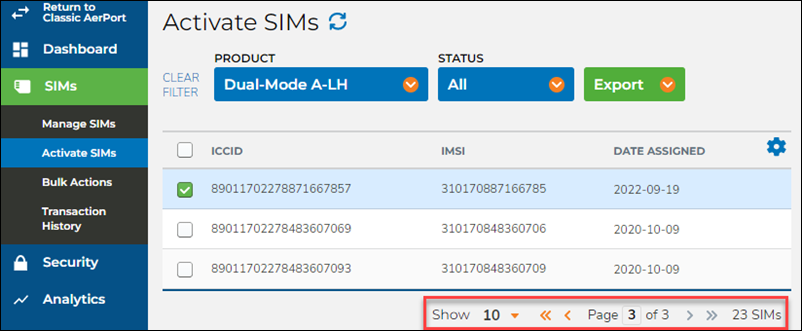
- Review the list of SIMs IDs displayed.
- Optionally select the product type from the Product list box, and the status type
from the Status list box.
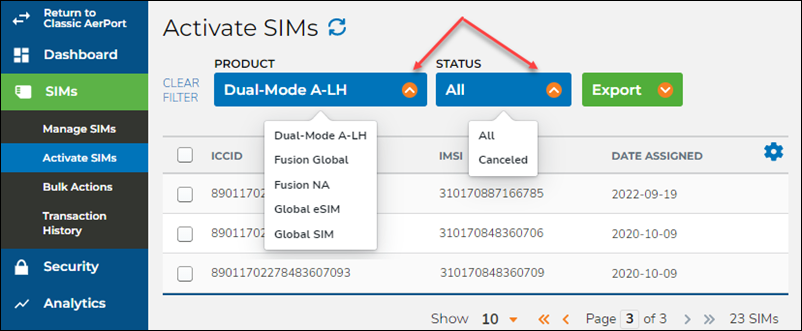
- Use the Show options to display the available SIMs.
- Select one or more ICCIDs. The ICCID(s) you select are added to the ICCID box on
the right side of the screen. Multiple ICCIDs are separated with commas.
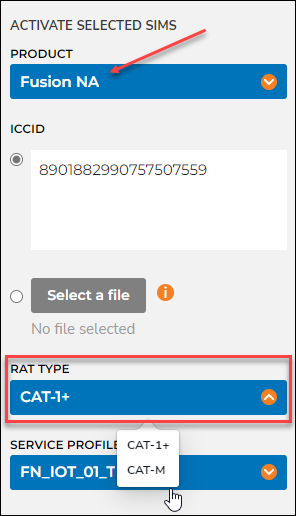
- Select the RAT Type, if the Product is Fusion NA. Choose from CAT-1+ and
CAT-M.
- CAT-1+ is used for higher throughput LTE devices.
- CAT-M is used for machine-to-machine slower throughput LTE devices.
- Select the Service Profile and Rate Plan for this SIM.
- The Service Profile is used to identify which network services your device
will have access to. The service profile names available for selection are
determined during the initial account setup.
Additionally, for Fusion NA, the Service Profile choices will change based on the RAT Type selected.
- The Rate Plan is the specific billing plan for your device. The rate plans available for selection are determined during the initial account setup. If the rate plan you select is part of a pool, the device will be added to that pool automatically.
- The Service Profile is used to identify which network services your device
will have access to. The service profile names available for selection are
determined during the initial account setup.
- Click the Configure Options button. On this form, there is one required fields:
Initial State. All other fields are optional.
Field
Mandatory?
Description
Device name
NO
This is an optional field that allows you to associate a unique name to your device's profile. The Device name field has a limit of 24 characters.
Device hardware version
NO
This is an optional field that allows you to track your device's hardware version. The hardware version field has a limit of 20 characters.
Device firmware version
NO
This is an optional field that allows you to track your device's firmware version. The firmware version field has a limit of 20 characters.
IMEI
NO
Specifies the unique reference (IMEI) number of the physical device as provided by the device manufacturer, in which the SIM is installed. For example, you have installed the SIM in a GPS device which has a unique IMEI number provided by the manufacturer. You can enter that IMEI number here.
Initial state YES Select the initial state.
- The Provision option is used for the initial provisioning, where activation of monthly billing is not yet desired. In the Provision state, the device can be used on the network, but monthly billing does not begin until data or time thresholds are exceeded as per the customer contract, or if the device is manually changed to bill state.
- The Bill option provisions the device for use on the network and also activates monthly billing.
Reprovision (retain last MSISDN and static IP address)
NO
- Selecting Yes will provision the device for use on the network using the same MSISDN (for Global SIM and LTE) and the same custom attributes (including device name) as its most recent subscription.
- If a device is cancelled and then reprovisioned within the same hour, activity on the new subscription may be recorded on the old subscription IDs for the first hour after the reprovisioning.
- If you are reprovisioning a Dual-Mode A-LH device, note that any previous custom attributes from its most recent subscription will not be retained.
- The Reprovision option is not available for Fusion NA devices that have been canceled for 60 or more days.
Assign static IP
NO
If your device requires a private static IP address, select Yes. Assigning a private static IP address can be done only by prior arrangement with Aeris, and if a virtual private network (VPN) is used for exchanging the data packets with your data centers. Additionally, you can provision your device with a static IP only if it is supported by the service name you have selected.
This option is not applicable for Fusion NA and Self-Serve SIM devices.
Report group number
NO
Use the report group field to classify and group devices in reports, for example in end-of-month billing summaries. A report group can contain up to 10,000 devices and there can be up to 256 unique report groups. The value of a report group cannot be greater than 2147483647. If a report group is not specified, your device will be assigned to group 0 by default.
Current location
NO
This is an optional field that allows you to track your device's current location. The current location field has a limit of 30 characters
Custom field 1-5 NO These are optional fields that allow you to track additional information on your device's profile. The custom attribute fields each have a limit of 64 characters. 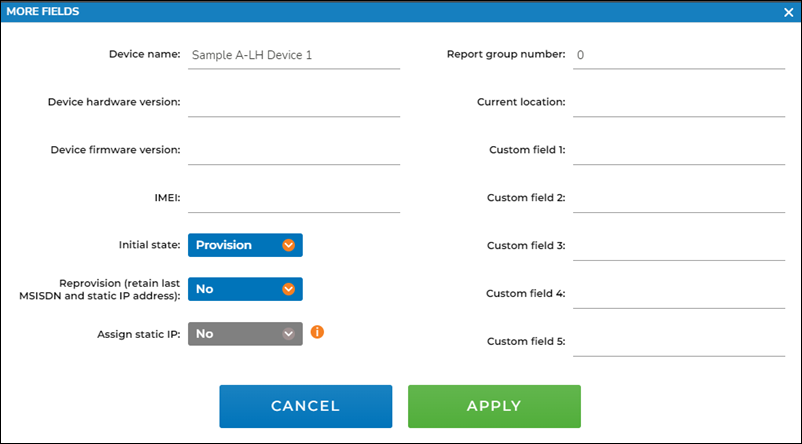
- Click Apply when done.
- Click Activate to complete the task. Confirm if you want to provision the SIMs. For Fusion NA devices, note that provisioning is an asynchronous activity, so there may be a delay in seeing the device status update in AerPort.
- AerPort provides you with the status of the operation. If successful, you can click on
the ICCID in the success box to gain access to the SIM Information box immediately.

Configuring the Access Point Name (APN)
After the SIM is activated, you need to configure the APN within your device to access data services. The APN is a reference to an IP address of the Aeris gateway (GGSN/P-GW) to which your IoT device will connect for data services. DNS is used to resolve the APN to the IP address of the Aeris gateway.
This process is described and demonstrated in a video in the Getting Started section of this documentation. See Getting Started - Configure APN. Because the AerPort portal screens look different than the screens in the video, here are the steps to look up the APN to assign to your device.
- After you have activated the SIM, click Manage SIMs.
- Locate and click the newly provisioned device. Notice that the status has changed to
Provision.

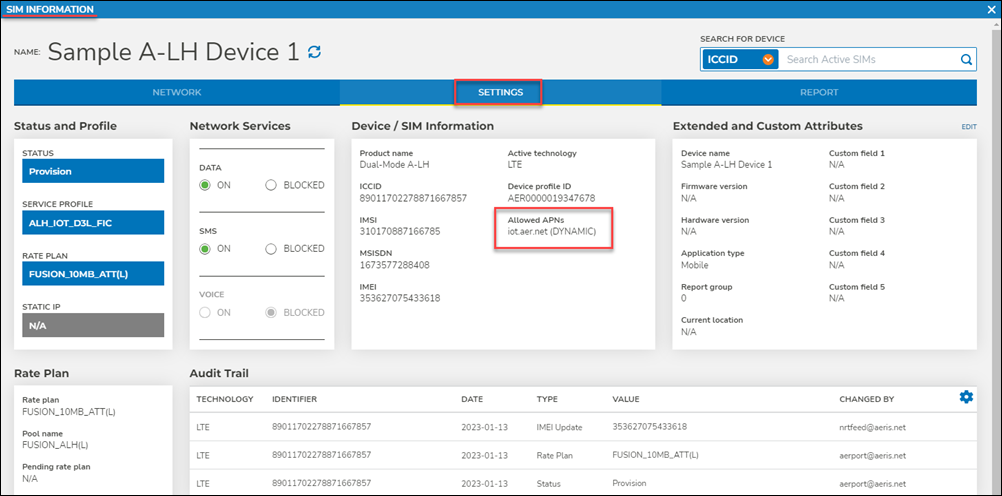
- The SIM Information box appears. Click the Settings tab and look for the
Allowed APN that you will need to assign to your device. In this case, the APN to
assign is iot.aer.net.
- Follow your device's instructions to assign this APN to the device.
- Continue with the steps below to test and troubleshoot as needed.
Testing and Troubleshooting SIM Activation
After activating a SIM and configuring the APN, it is time to test whether the SIM is correctly registered onto the network, in a data session, and able to communicate.
- Select Manage SIMs from the left menu in AerPort.
- Locate and click your device.
- In the SIM Information box, view the Network tab.
- Observe the status of Registered, In Data Session, and IP Address.
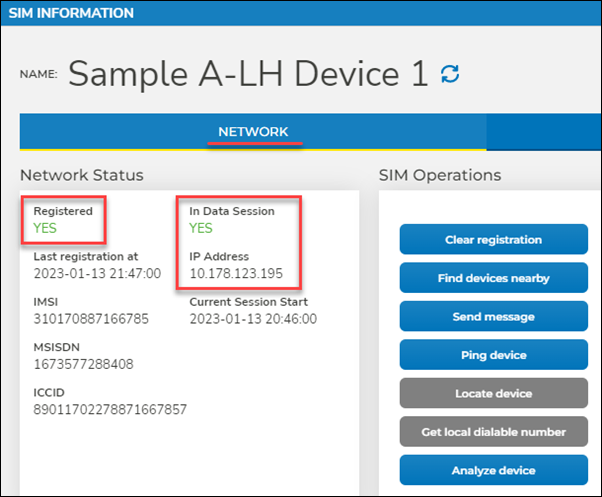
- Compare what you see to the following table.
Network Status
Troubleshooting Steps
Registered YES
In Data Session YES
IP Address is assigned
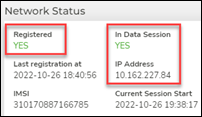
It appears that this device is fully connected to the network.
If you are having issues communicating with the device, try the recommendations below:
- Ensure that the IP address that you are trying to connect to is routable.
- Ensure that the software on the device is configured to route to the interface.
- Click Ping device which pings the device from inside the Aeris network. If the device supports Ping and this operation works, there may be an issue of connectivity between your data center and Aeris.
- Click Clear registration to force the device to re-register.
Registered YES
In Data Session NO
IP Address is not assigned

It appears that this device is currently registered and has previously been able to establish a data session. Following are recommendations for troubleshooting: - Ensure the APN in the device is set correctly, including dots, case-sensitivity, etc.
- Ensure your device is set to allow data and data roaming.
- Click Send message then enter a short message and click Send to validate that your device is properly registered.
- Click Clear registration to force the device to re-register.
- If the above steps do not establish a data session, power-cycle the device and try again.
- If you are testing the SIM in a mobile phone, try turning off Wi-Fi to see if this causes the SIM to start a data session.
If the above steps do not solve the problem, please create a Support ticket.
Registered NO
In Data Session NO
IP Address is not assigned
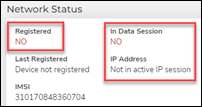
This device has either never successfully registered on the network or has not registered in the last 48 hours. Following are recommendations for troubleshooting:- Ensure the SIM is inserted into the device correctly.
- Ensure that you have configured the APN.
- Ensure that your device is correctly configured and authorized, i.e. not SIM-locked.
- Ensure that the device is powered on and it is not in radio-off mode, such as airplane or sleep mode.
- Ensure that the device is within the coverage are for the carrier.
- After completing the above steps, power-cycle the device.
- Check the Aeris network status by closing the SIM Information box, and then selecting Network Status from the left menu.
If the above steps do not solve the problem, please create a Support ticket.
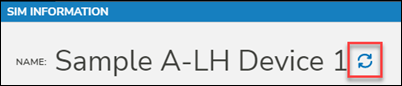
- To refresh the content in the Network tab of the SIM Information box,
click the refresh icon next to the device name. If your device does not have a
name, the ICCID is displayed.
- Click Ping device to test the network communication with the device.
- If the device supports SMS, click Send message, enter a short message, and click Send to test sending a mobile-terminated SMS to the device.
- If the device supports Voice, click Get local dialable number. The resulting number is valid only for a short time. Use a phone to call the dialable number.
- If you are testing the SIM in a mobile phone, go to the browser and test network connectivity by entering a URL, such as https://www.aeris.com.
- Optionally click Find devices nearby if you have a group of devices that all use the same cell tower.
0 Comments